Building a Program
A Program workflow is used to design or represent a curriculum. It is not necessary to create a program level workflow. A user can create an activity only or a course only workflow depending on their needs.
To access Program Workflow page, refer to Homepage or Navigation Panel.
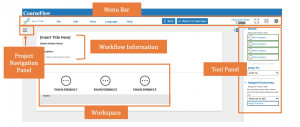
- Program level Workflow Information
- This same information is required at all levels: Title (of Program), Author, Description - Program level Workspace (Columns)
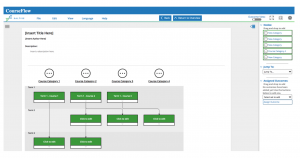
- By default, the Program level is made up of three columns.- Each column corresponds to course categories. An arbitrary number of these can be added and customized to divide your program as you see fit.
- Column sequence can be changed by selecting the top icon and dragging it to the preferred column.
- Column titles can be edited
- Term 1, Term 2 text can be edited - A program is by default organized into terms. For some users it may be better to organize these by year or level, in which case the "terms" can be renamed by double clicking the text to be given a custom name.
- Program Tool Panel
- The sections of this panel are different for each level
- See Program Workflow Panel sections below.
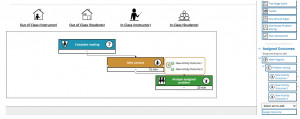
4 & 5) Project Navigation Panel and Menu bar are the same on all levels
Program Workflow Tool Panel
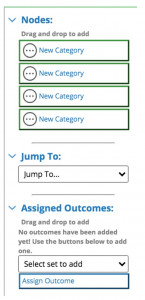
Program Workflow Tool Panel Nodes:
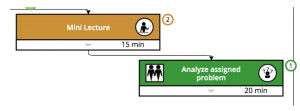
Nodes: the nodes within a program each represent an individual course, and can be linked to a course workflow. Unlike at the course and activity level, a linear time progression is not relevant. Courses can be organized into terms, but can be positioned side by side within a term.
Jump to: When you create terms for your program you can use this feature to jump to that section.
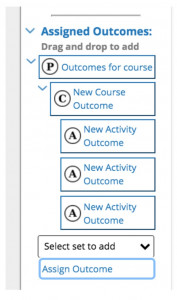
Assigned Outcomes: This is how you assign Learning Outcomes to nodes within your workspace. This will be described in more detail below.
How to Build a Program
Unlike the course or activity/lesson levels where the nodes are pre-named by default at the Program level all nodes are named New Category. These can be renamed by the user.
Adding and Moving Nodes
- To add more nodes, drag and drop the nodes where you want them on the workspace.
- Once dropped they can easily be moved from column to column and up and down levels (terms) within the workspace section.
Adding Columns
- As previous mentioned by default the Program Level has 3 columns which can be modified.
- Columns by default are named Course Category 1, etc.. which can be renamed by the user.
Adding Lines between Nodes
Unlike the activity/lesson level, nodes at the program and course levels are not linked by default, as the relationship between nodes is not as simple. Links (lines) between nodes have to be made by the user and should be used to illustrate the hierarchy of the courses and terms within a program.
Link nodes (add lines)
Click on the handle (dot) , which appears when the node is hovered over, and drag it to connect to the handle of another node. This creates a line that ends with an arrow.
Adding Content to a Node
Adding content to Program node is the same procedure as Course and Activity/Lesson Workflow Levels.
Edit Node Panel

Content added on this panel appears on the selected node.
- Title: What is typed here appears in the node coloured box
- Description (node text box): This space can be used to elaborate on the course. Content here appears below the node title coloured box. Note: This portion of the node is hidden by default, however it can be toggled open by clicking on the arrow at the bottom of the node. Once this portion is shown, it can be resized manually to accommodate more text. (see Manipulating Nodes above)
- Time: You can allocate time to a specific node. It will appear at the bottom of a node.
- Linked Workflow: This enables you to link a workflow to this node. For example, a node in a Program Workflow can be linked to a Course workflow to denote that course is used here within this section of the program. Double clicking on the node will automatically open the linked workflow.
Outcomes
This is where you create learning outcomes. Learning Outcomes are used to track your learning objectives/outcomes or course competencies. Outcomes are assigned to nodes (lectures, labs, assessments, etc..) to signify that the course will address the outcome(s) either in part or entirely.
To access (and name) the Outcomes page, refer to Homepage (section - Project Overview page) or through the Project Navigation Panel (a). Remember to name your outcomes page.
- Program outcomes: a program outcome is the top-most level: it is a learning outcome that would be designed at the curriculum development stage. Often the Program outcomes for a program will roughly correspond to the different courses, and in some fields may match up one to one with individual courses. These are sometimes called Competencies (the Competency or Competencies provided from the Ministry or institution).
- Course outcomes: A Course outcome is the next highest level: a program outcome is made up of probably 3-8 course outcomes, which are the main broad points a course should address. These might correspond to units in a course or be more nebulous depending on the field of study. These are sometimes called Elements of Competency (the Elements of Competency / learning objectives and or outcomes).
- Activity/Lesson outcomes: An Activity outcome is the finest grain outcome. This should correspond to specific things a student should learn or be able to do after taking the course. They should generally be something that an activity will be specifically geared to address, either in part or entirely (the intended Learning Outcome for a lesson).

Project Navigation Panel (a) and Menu bar function the same way as the other Courseflow Levels
Add, Edit, Delete Outcome(s)
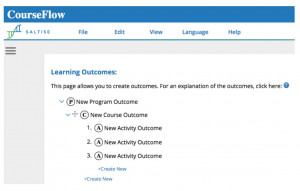
- To add more outcomes, click on Create New
- To edit click on the outcome's text to edit.
- To delete click on the red box with an X when you hover over the text.
Assign Outcomes to Nodes within your Course or Activity
Once your outcomes are complete use the Project Navigation Panel to move back to the CourseFlow where you want to add your outcomes.
Under Assigned Outcomes
- Click on - Select set to add
- From the drop-down list select the outcome to add
- Click on Assign outcome
- Continue until all the outcomes can be seen
Once expanded, outcomes can be dragged and dropped (assigned) to a specific node on your workflow.
- As you add outcomes, indicators (dots with numbers) will appear next to the nodes.
- To see which outcomes have been assigned to a node, mouse over the number.
- When all outcomes have been addressed (linked to nodes), the Course outcome will also be addressed, and when all Course outcomes have been addressed so will the Program outcome.
Drag and drop the outcome on to the node where the learning outcome will be addressed
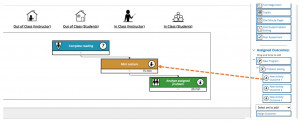
Numbers indicate how many outcomes are attached to the node
Mouse over the number to see the Outcome(s) that have been assigned.